
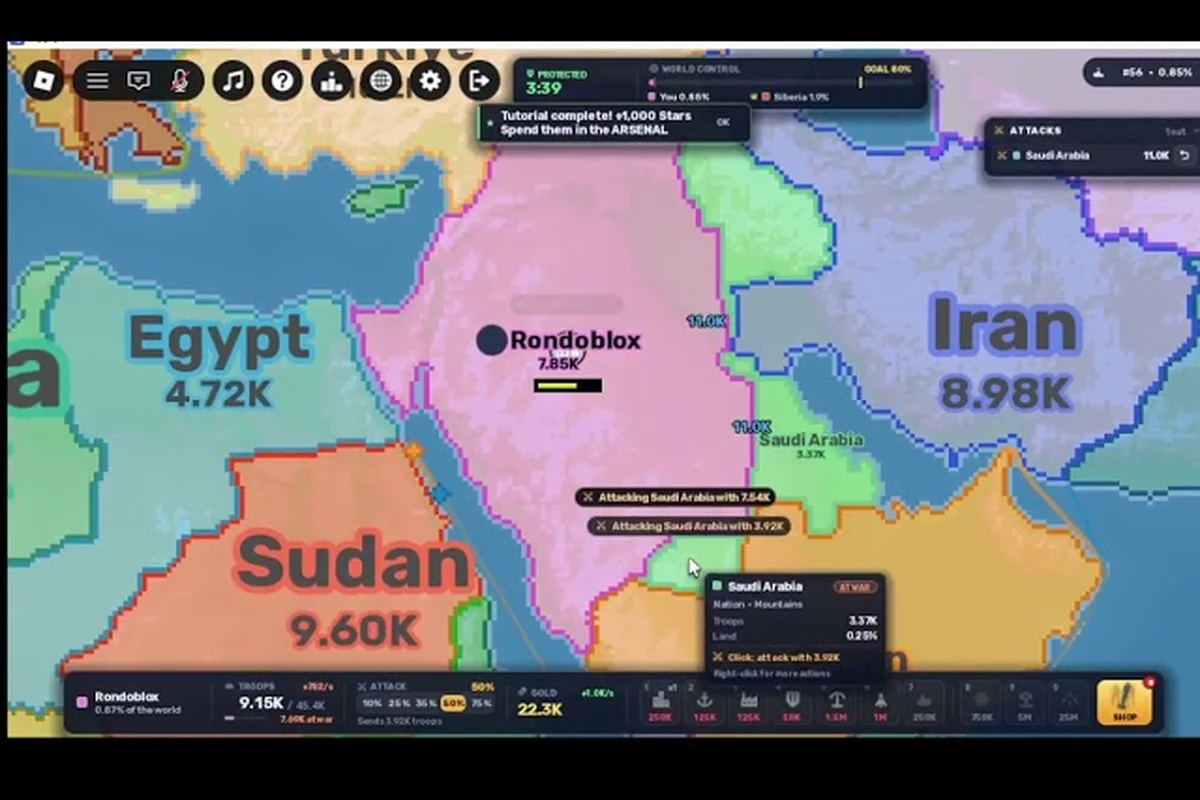
A good roWorld map guide can determine whether your opening is safe, connected, and built for expansion. The official game page confirms a shared world of 88 player nations and hundreds of tribes, so understanding routes, capitals, coastlines, and chokepoints matters from the first match.
The roWorld World Map at a Glance
The roWorld world map places real-world countries and regions into a competitive strategy board where cities, ports, factories, alliances, and nuclear weapons shape the larger contest. According to the official RoWorld game page, the victory condition is controlling 80% of the world, with servers supporting as many as 55 players.
That creates a simple planning problem. Your first capital should offer defensible neighbors, room to claim adjacent land, and useful access to the wider map. A visually impressive location may still be poor if every approach passes through a crowded border, while a quieter inland region can become excellent once factories and cities support your expansion.
| Map feature | Strategic value | Main risk | Best opening priority |
|---|---|---|---|
| Coastal capital | Access to ports and sea routes | Exposed to amphibious pressure | Claim a protected coast and one inland border |
| Inland capital | Stronger land-based defense | Slower access to port benefits | Secure multiple adjacent regions early |
| Border capital | Immediate access to unclaimed land | Easy for rivals to pressure | Build defenses before overextending |
| Island capital | Strong separation from mainland rivals | Limited land expansion | Preserve control of sea access and nearby land |
| Central capital | Potential access to several directions | Many neighbors can surround you | Develop a dependable core before branching out |
| Peripheral capital | Room for broad expansion | Far from central activity | Build economy while securing a safe first border |
Seven regions to recognize
The confirmed full world uses recognizable countries and regions, but it does not have an official seven-region directory. For practical planning, divide the roWorld full world map into seven broad strategic areas. The names below describe how to read the board rather than claiming official map labels.
| Strategic area | What to look for | Expansion pattern |
|---|---|---|
| Continental core | Dense neighboring states and central cities | Consolidate defensively, then attack outward |
| Coastal belt | Ports, sea access, and exposed borders | Build ports, secure inland depth |
| Island chains | Separate landmasses and crossing options | Prioritize supply links and nearby islands |
| Continental edges | Fewer immediate land neighbors | Claim a broad interior before rivals arrive |
| Northern territories | Remote capitals and broad empty space | Develop economy and form a defensive perimeter |
| Southern territories | Connected land and mixed coastlines | Use borders to support a central push |
| Western or eastern frontiers | Asymmetric access to neighbors | Choose either a compact strong start or a wide frontier |
This regional framework makes the roWorld map list more useful than memorizing individual borders. You can mark each area by the number of land neighbors, available coastline, and distance from active capitals, then assign a risk level based on those visible conditions.
Read the board in layers
Start with the broad map, then zoom toward your chosen region. First, locate occupied and unclaimed land. Next, identify capitals, city clusters, ports, factories, and any visible fronts. Finally, trace the narrowest land corridor that connects your territory to the center of play.
This layered reading is essential because the roWorld map changes as players claim land and build infrastructure. A border that looks empty at the start may become the main route into your capital later. The broad layout informs your opening, but the local view determines each next move.
Capitals, Borders, and Land Connections
Your capital is more than a starting marker. It determines where your economy can grow, which borders you must watch, and how quickly you can reinforce distant expansions. Because RoWorld supports multiple nations and tribes, choosing a position with several usable land borders is usually more flexible than choosing a cramped capital with a single exit.
The official listing describes 88 player nations plus hundreds of tribes sharing the map. You should therefore expect competition for attractive territory, especially around central cities and transport-rich coastal areas. The number of visible neighbors matters more than the country attached to a capital, although local conditions can still shape your first moves.
Score a capital by its connections
Evaluate each potential capital using these four questions. Can you claim at least two nearby regions? Does the position have a port or protected coastline? Is there a defensible inland route behind the capital? And are the surrounding capitals occupied, connected, or isolated?
| Capital profile | Land access | Sea access | Early-game reading |
|---|---|---|---|
| Two or more open borders | High | Variable | Flexible expansion with moderate exposure |
| One open border | Low | Variable | Vulnerable if that border becomes a front |
| Several narrow corridors | Medium | Usually low | Valuable defensively but can slow expansion |
| Broad coastline | Medium | High | Strong port potential, greater exposure |
| One-sided peninsula | Medium | High on one side | Can develop a protected core if the land exit is secured |
| Remote interior | Broad | Low | Safe start, though reaching central targets takes longer |
These are geometric assessments rather than published map statistics, so treat them as a planning model rather than a fixed ranking of the roWorld world map. In the table’s terms, a capital with one open border is exposed if that route becomes a front, while a capital with two or more open borders offers flexible expansion but moderate exposure. Because borders, port access, and corridor control can change after several matches or updates, an initially open position may become surrounded; recheck land access, sea access, and early-game exposure before committing to a capital on any roWorld map.
Count real land borders
A neighboring country is not automatically a direct threat. Another capital may be farther inland, behind a neutral region, or separated by a narrow corridor. Draw the shortest land path to each nearby opponent instead of assuming every visible country touches your position.
For a practical roWorld map strategy, prioritize a capital with two practical land exits, one interior fallback, and at least one route toward useful infrastructure. If all three cannot be found, place the capital where it can be defended cheaply and connected to the nearest safe expansion.
Treat ports as a route, not a decoration
A port can make distant territory more valuable, but it also creates another direction from which pressure may arrive. Players should not build a port merely because a capital is coastal. The better decision depends on whether the port links a protected interior to isolated land, whether nearby sea routes are crowded, and whether your territory can support the connection.
When reviewing the roWorld map tactics guide, use ports as part of a broader chokepoint plan. The strongest coastal opening links defensible land, a controlled port, and a nearby expansion target rather than scattering attention across an entire shoreline. Treat that as a planning rule rather than a fixed statistic.
How to Read the roWorld Map List
The only fully confirmed board is the full world map with real country names. Other boards—including regional, lake, island, and abstract variants—have appeared in community reports and player videos. They should not be presented as an official, fixed rotation. Use it to choose the next move, then confirm details in the live match.
A community video by VendoPlus shows a compact orientation of RoWorld, previously called RoFront in community titles, including the map layout and early actions. Its value is visual rather than statistical: it illustrates the general loop of choosing a nation, placing a capital, expanding, and meeting neighbors.
Official and community-reported boards
| Board status | Example | Confidence | How to use it |
|---|---|---|---|
| Confirmed official board | Full world with real country names | High | Plan around real borders and capitals |
| Community-reported board | Strait of Gibraltar | Medium | Compare regional connections and crossings |
| Community-reported board | Montreal or Cape Cod areas | Medium | Check climate, neighbors, and coastal access |
| Community-reported board | Clearwater Lakes | Medium | Compare inland and lake-based routes |
| Community-reported board | Arctic | Medium | Favor frontier expansion and resource depth |
| Community-reported board | Sierpinski | Medium | Study the abstract layout and border shape |
| Community-reported board | Humans vs Nations | Medium | Compare different roles and pressure patterns |
| Community-reported board | Las Vegas Trip | Medium | Treat as a niche community-observed board |
Because the roWorld all maps selection can change or remain experimental, confirm the board displayed at the start of a match. Do not rely on an old screenshot as proof of the current lineup. Regional names and labels may also be community shorthand rather than official descriptions.
Understand abstract-map decisions
Abstract boards replace familiar geography with simplified shapes, so the opening decision is structural rather than based on matching a real-world roWorld world map. Compare each layout by its large open areas, narrow necks, isolated islands, and capitals with unusually direct access to the center. For example, a compact center makes early contact with opponents easier, while scattered islands provide fallback positions only if one dependable sea route can be maintained. These differences determine whether expansion creates connected reinforcement paths or divides the economy across vulnerable pockets.
| Abstract feature | Likely advantage | Likely danger | Corrective choice |
|---|---|---|---|
| Large open territory | Fast regional expansion | Wide exposed perimeter | Build depth before claiming distant pockets |
| Narrow central neck | Natural defensive choke | Forces one route for movement | Secure both sides before rivals contest it |
| Scattered islands | Multiple fallback positions | Weak connection between holdings | Prioritize one dependable sea route |
| Compact center | Fast contact with opponents | Very little room to maneuver | Avoid an early all-out expansion |
| Broad outer ring | Many expansion routes | Long reinforcement lines | Develop a connected interior corridor |
The roWorld abstract map overview provides more context for choosing between compact and large layouts. On a compact center, prioritize capitals and nearby open territory before taking scattered islands, because each new holding increases movement distance. On a broad outer ring, claim a connected interior corridor first; distant pockets with long reinforcement lines can expose your economy to collapse when rivals contest a narrow neck. Regardless of the board, the strongest opening preserves movement options and avoids dividing your economy across disconnected pockets.
Choosing the roWorld Best Map for Your Style
There is no single roWorld best map for every player. A cautious strategist benefits from protected interior space, an aggressive player values several expansion directions, and a builder needs access to cities, factories, and ports. The better map is the one that supports your preferred tempo without creating an immediate multi-front problem.
Match the board to your risk tolerance
| Player style | Preferred opening | Avoid when possible | Main objective |
|---|---|---|---|
| Defensive builder | Inland capital with room behind it | Exposed coastline and several narrow entrances | Consolidate a secure economic core |
| Fast expander | Two or more open land borders | A capital with only one exit | Claim connected land before opponents close it |
| Coastal trader | Protected bay or peninsula | Wide shoreline beside a busy power | Connect ports to inland resources |
| Opportunistic fighter | Border position near a visible front | A remote area with no nearby target | Secure one border, then choose one opponent |
| Alliance builder | Central location with several approaches | A position that forces contact with every neighbor | Make contact manageable and negotiate from strength |
The roWorld best map choice also changes with the match. A quiet server may leave open land that looks safer in a crowded one. Likewise, a crowded center can provide targets for an aggressive opening but punish a nation that has not established enough economy.
Consider map size as a route problem
A large map offers more room but increases travel and reinforcement demands. A compact map makes opponents easier to reach, yet it also reduces the number of safe expansion zones. Instead of treating size as a simple advantage, estimate how quickly you could connect your capital to a distant target.
Ask four practical questions: first, count the minimum capital-to-target marches at the map’s normal movement speed, then compare that travel time with the reinforcement time needed to secure a second border; for example, if a distant city requires three marches but arrives after rivals can consolidate two nearby regions, it is not a viable opening target. Next, check whether the same route can be redirected to a defensive fallback, whether that detour still allows you to reach a third region, and whether the available ports can maintain supply when a land corridor closes. These comparisons turn map size into a concrete route-planning test for any roWorld full world map, helping identify a strong capital position without assuming that a larger or more compact board is automatically better.
-
Can you reach a useful third region before rivals reach you?
-
Can your capital retreat into a defensible interior if one border fails?
-
Are valuable cities connected by land, or do they depend on ports?
-
Does expanding strengthen one core, or create several fragile outposts?
These four route-planning questions apply equally to a roWorld real-world continent, a regional board, an abstract arena, and any entry in the roWorld map list. Their value is comparative: a two-march route to a resource-rich city may be strategically stronger than a one-march route to isolated territory, because the earlier arrival can fund the next march without exposing the capital to a rival landing. In an roWorld world map, score each option by march time, border security, port dependence, and the number of connected regions gained, then expand in layered routes that reinforce one core rather than scattering garrisons across vulnerable outposts.
Let the spawn reveal your opening
Your starting nation and nearby territories matter, but the local spawn may be equally influential. The roWorld nation selection guide explains how a nation choice can support different strategic goals. On the map, compare that nation’s likely opening with the capital locations actually visible on the board.
If the nation has strong industrial or military identity but faces several crowded borders, a remote capital may give it room to develop. If the nation is weaker in early conflict, an interior position behind one approach can protect it while its economy catches up. The right choice is not a label; it is a location that complements the nation’s role.
A Step-by-Step roWorld Map Strategy
A strong roWorld map strategy follows a consistent sequence: assess the board, claim a defensible core, secure a second border, connect expansion, and only then fight for distant territory. This sequence works because every new region should strengthen an existing network rather than create another isolated commitment.
Phase one: assess the visible field
Before claiming, scan the full board for three things: where most capitals are concentrated, where empty land remains, and which cities or ports are isolated. Then zoom into the area you intend to enter. A world-scale overview can make a frontier look peaceful while a nearby capital is already expanding toward it.
| Observation | Strategic inference | Action |
|---|---|---|
| Empty center | Contested space may open quickly | Avoid making it your only target |
| Dense capital cluster | Strong competition and possible alliances | Choose a defensible neighboring position |
| Broad empty frontier | More land but longer supply lines | Secure a connected corridor inward |
| Isolated city or port | Valuable but potentially exposed | Establish a link before investing heavily |
| Narrow land corridor | Natural battleground | Avoid standing alone on one side |
Phase two: claim a compact core
Your first claim should create a dependable base with room to defend. Look for Core Depth: enough surrounding land that attackers cannot reach every important building at once. A capital surrounded by unclaimed land is easier to develop, but expanding too far before securing the interior can leave a thin defensive line.
Prioritize a Defensible Interior before chasing distant cities. The best opening often resembles a layered shape: capital at the core, a protected ring of land around it, and one controlled route for expansion. This shape supports future defense without requiring constant unit movement across distant territory.
Phase three: secure one reliable expansion
After establishing your core, take a second region that is adjacent to secure territory. A connected claim is easier to defend and cheaper to support than an isolated jump across the map. Its purpose should be practical: gain a city, a port, useful factories, a better border, or access to a larger neighboring region.
| Expansion target | Value | Risk | Safer approach |
|---|---|---|---|
| Adjacent inland region | Adds land and depth | Moderate | Secure before building outward |
| Nearby coastal city | Adds port access | Higher exposure | Build a protected land route first |
| Distant powerful capital | High reward | Very high | Delay until the core is stable |
| Empty frontier territory | Room to grow | Low immediate value | Claim when it supports a corridor |
| Neutral buffer land | Prevents encirclement | Delayed payoff | Take when rivals threaten the core |
Phase four: connect economy and territory
Your objective should shift from claiming more land to making the land work together. Connect factories and cities to your capital, use ports only when they shorten a useful route, and keep expansion within a supportable area. A compact network can be more valuable than several disconnected regions, especially when opponents begin contesting borders.
Phase five: choose a front deliberately
Eventually you must choose where to press. Rather than attacking every neighbor, compare fronts using three questions: Which opponent offers the most valuable capture? Which target has a weaker connection to its allies? Which route can you reinforce without exposing your capital?
Keep a reserve of land near the core even after claiming a useful prize. This reserve lets you respond to a second front or absorb a failed attack. It is also why border-heavy players sometimes win against more aggressive opponents who have overextended.
Reading Rivals, Capitals, and Chokepoints
The map becomes a strategic puzzle when you read how rivals relate to one another. A nation with several nearby opponents may be distracted, while an isolated power can focus entirely on the frontier nearest your territory. You do not need to know another player’s full plan; identify the pressure they create.
Identify defensive shapes
Look for capitals backed by a broad inland area, ports guarded by narrow approaches, and powers whose territory forms a ring around another nation. These formations create defensible regions. A good target is often the least protected side of a large formation, but only when you can approach without fighting through several other players.
| Rival shape | Likely strength | Likely weakness | Useful response |
|---|---|---|---|
| Broad interior core | Strong defense | Limited early access | Pressure the border, avoid a frontal rush |
| Narrow corridor | Controlled movement | Dependency on one route | Watch for a collapse or bypass |
| Long coastline | Ports and trade | Exposure across many fronts | Threaten only where the core is thin |
| Scattered holdings | Flexible options | Reinforcement problems | Cut links before direct capture |
| Several allied capitals | Shared strength | Coordination demands | Wait for separation or overextension |
Use chokepoints without tunnel vision
A chokepoint is valuable because it reduces the number of approaches, but it can also become a trap. If your capital has only one defensible exit, blocking that route may isolate you. Conversely, a narrow passage into enemy territory can make a coordinated push more manageable.
A Chokepoint Anchor should be controlled, not merely occupied, because troops need a secure rear route and a defensible forward position to prevent a counterattack from cutting the approach. On a roWorld map, surround the passage with a shallow buffer, keep nearby territory linked to your capital, and use scouts to identify flanking routes before reinforcing the front. For example, blocking a one-tile bridge with a small strike force can expose that force if enemy units arrive from a second entrance; securing the adjacent junction first preserves the option to reinforce without abandoning the capital.
Read capital movement as a signal
When a rival capital shifts, abandons a border, or starts building near one route, consider the consequences. A withdrawal may be temporary, while a new port or city can indicate a larger plan. Community gameplay loops repeatedly show capitals, borders, and infrastructure developing together, although the exact construction rules are not published by the developer.
Treat these patterns as signals rather than certainties. The roWorld current meta guide can help with faction and strategy context, but the map still determines which threat reaches you first. For example, an enemy capital moving toward your northern border can redirect pressure away from a busier southern lane, while a new port beside a narrow corridor may shorten reinforcement travel. Compare capital shifts with the roWorld world map’s roads, coastlines, and chokepoints before committing your next route; construction rules remain unpublished, so treat each interpretation as a working plan rather than a confirmed mechanic.
The roWorld Full World Map Planning Checklist
Before committing to a capital, compare each candidate through the same roWorld map-planning checklist: starting resources, expansion routes, neighboring land claims, and the space left for later regional boards. A capital may look centrally placed yet restrict long-term movement; choosing an edge settlement can preserve more open map space for nearby cities and later territorial links. The process also works on smaller regional boards, where the same layers appear in compressed form, making weak starts and wasted expansion paths easier to spot.
Pre-claim checklist
-
The capital has at least one clear inland fallback.
-
One direction toward nearby land remains available for expansion.
-
The nearest coast or port is useful rather than merely visible.
-
You can identify the shortest path to one important city.
-
Your intended route does not pass through several rival capitals.
-
The opening shape can be defended before it becomes large.
Early expansion checklist
-
New territory is connected to the capital by land or a planned supply route.
-
The claim increases defense, economy, or access to a meaningful target.
-
You are not depending on a distant neutral region staying neutral.
-
Any port is linked to productive land behind it.
-
Your capital retains a reserve area for a second front.
-
You can explain the next claim without needing an exact cost calculation.
Midgame review
Revisit the board after the early economy develops. Compare your current position with the opening plan and ask whether the map changed faster than your strategy. Another player may have taken a corridor, closed a port route, or created a threat on a second border.
| Review signal | Meaning | Adjustment |
|---|---|---|
| Core border is crowded | Rivals are testing the weakest side | Consolidate inward before expanding |
| Port route is contested | Supply links are no longer secure | Develop an alternative overland route |
| Ally controls the central route | The map has shifted around you | Secure a side passage or negotiate terms |
| Remote territory is isolated | Expansion lacks reinforcement | Connect it or release attention |
| Several borders are quiet | Opponents face pressure elsewhere | Prepare a limited, focused attack |
No official in-game or stat-specific values are published for the complete world map, so this guide avoids unsupported claims about exact bonuses or guaranteed outcomes. The safest recommendations come from visible geometry, official victory conditions, and recurring community observations. That keeps expectations realistic whenever the board or patch changes.
Frequently Asked Questions
Is there an official roWorld map list?
The official Roblox page confirms the full world map with real countries, but it does not publish a complete official catalog of every alternate board. Regional, island, lake, and abstract maps have been reported by players, so check the current game interface before treating any community list as fixed.
Which roWorld world map is easiest for beginners?
The easiest map is usually the one offering a protected interior and several connected land routes, not necessarily the smallest or most familiar board. A broad frontier can work when you can claim depth, while a compact map is better when your nation needs quick access to cities and manageable opponents.
Should beginners choose a coastal or inland capital?
An inland capital is usually easier for beginners because it reduces early exposure and simplifies defense. A coastal capital becomes stronger when the port connects to protected territory and supports a clear expansion route rather than merely extending your vulnerable perimeter.
What is the best roWorld map strategy for expansion?
Expand in connected layers: establish a defensible core, claim one adjacent region, connect useful infrastructure, and only then target distant prizes. This approach supports your economy, reduces reinforcement problems, and makes it easier to defend when a second border becomes dangerous.
How do I identify the roWorld best map in a match?
Look for open land, a viable city or port connection, manageable capital pressure, and at least one inland fallback. Because conditions change between matches, judge each board as it appears rather than relying on a fixed ranking of community-reported maps.